To connect Bluetooth devices to a Raspberry Pi using a BTD-300, follow the steps below:
-
Plug in the BTD-300:
Plug the BTD-300 into an available port on the Raspberry Pi. If not enough ports are available, a USB hub can be used. -
Update the system:
To make sure you’re using the latest, most stable version, update the system before installing anything by opening a terminal and running these two commands:
sudo apt-get update
sudo apt-get upgrade -
Install the Bluetooth stack: To install the BlueZ Bluetooth stack and the Blueman Bluetooth manager, run the command:
sudo apt-get install --no-install-recommends \bluetooth bluez-utils blueman bluez \ python-gobject python-gobject-2 -
Install Bluetooth audio support:
The default installation won’t be able to set up audio connections with headsets and speakers. If you need to use Bluetooth audio, install pulseaudio and its Bluetooth audio module:
sudo apt-get install pulseaudio pavucontrol \pulseaudio-module-bluetooth
Reboot the Raspberry Pi when the installation is finished. -
Connect a device:
Now you can use the Bluetooth Manager to find and connect your Bluetooth device. First, open the Bluetooth Manager:
blueman-manager
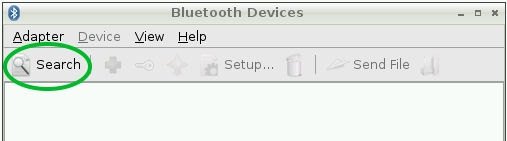
Make sure your Bluetooth device is in “pairing mode,” then click the “Search” button in the Bluetooth Manager.
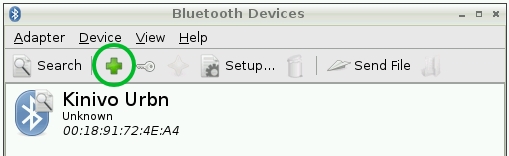
Your Bluetooth device should appear in the list of pairable devices. Highlight it, then click the Add button that looks like a plus sign.
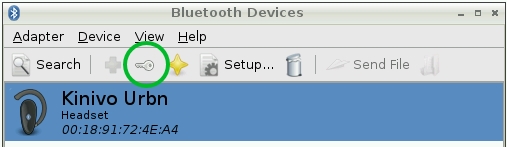
After you add your device, click the Trust button that looks like a key to finish pairing the device.
At this point, you should be able to use most devices, but audio devices will take a little extra work. -
Connect Bluetooth audio services:
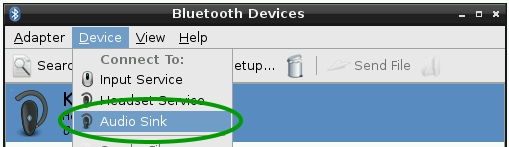
If you’re using a Bluetooth headset or speaker, you’ll need to connect the Bluetooth audio services. In the Bluetooth Manager, highlight your headset or speaker, then choose “Connect To: Audio Sink” under the Device menu.
-
Choose an audio type:
Bluetooth audio can use the Hands-Free profile (highly-compressed mono audio with microphone support) or the Advanced Audio Distribution Profile (for high-quality stereo audio.) We’ll need to tell the system which audio type you want to use. First, run:
pacmd list-cards
This will list all of the available audio output devices on the Raspberry Pi. Look through the list until you see:
index: 1
name:
The index number and the MAC address (00_1A_2B_3C_4D_5E) will be different. Make a note of the index number, then run the command:
pacmd set-card-profile {index} a2dp
Where “{index}” is replaced with the index number from the list-cards command. This will tell the Bluetooth audio device to transmit stereo audio, suitable for music and movies. -
Choose the Bluetooth audio sink:
The system is ready to send Bluetooth A2DP audio, but it’s probably still set to use the built-in Analog or HDMI outputs. It will need to be switched to the new Bluetooth audio sink. First, run:
pacmd list-sinks
This will list all of the destinations audio can be sent for playback on the system. Look for:
index: 1
name:
Once again, the index and MAC address may be different. Make note of the index and run:
pacmd set-default-sink {index}
Where “{index}” is replaced with the index from the previous command.


The system should now be ready to play music through your Bluetooth audio device. If you have an audio file on the system, you can install mpg123 or VLC to try playing it:
sudo apt-get install mpg123
mpg123 {file name}
or
sudo apt-get install vlc
vlc {file name}